The Incomplete Doc on Thief 2s
New Sky Rendering Mission Parameters
By: Bill Farquhar
Edited by: Rob $ Caminos
The new sky is rendered as four separate components: sky, stars, celestial object, and clouds.
When the new sky is enabled, the remaining components may be optionally switched on or off.
If the new sky is NOT enabled, then the old-style sky rendering will occur.
Here is each component, and an explanation of the mission parameters.
NewSky:Sky
Some quick info. The sky is rendered as a sort of dome around the camera. If the camera were at the center of this dome, then all points in the sky would be equidistant from the camera, and fog would be applied equally to all points in the sky. This would suck. As a solution, we render the sky as a dome, but with the camera offset from center - up toward the edge of the dome. When we do this, the parts of the sky directly above are close, when those on the horizon are far, which gives us a nice fog.
Sometimes, latitude and longitude angles are specified. Longitude angles stars at +x, and move
counter-clockwise to +y. Latitude angles start at the pole (directly above camera), and move down to the horizon at 90 degrees.
"Enable New Sky"
When enabled, the new-style sky is rendered, and all other new-style components become available.
"Enable Fog"
When enabled, any fog defined for the mission is applied to the sky.
"Atmosphere Radius"
The radius, in feet, of the sphere that represents the sky, with "earth" at the center.
"Earth Radius"
The radius of the "earth", in feet. In other words, the offset from center where the camera is. The closer this number is to "Atmosphere radius", the less sky directly above is fogged. This number should always be less than "Atmosphere radius".
"# of latitude points"
Designers scale the complexity of the sky rendering. The more points that represent the sky, the better it will look, but at the cost of memory and framerate. This value represents the number of latitudinal lines (east/west) represented in the sky. Image a globe, with its lats and longs, viewed from the inside. This is our model of the sky, and the North pole is always pointing straight up.
"# of longitude points"
The number of longitudinal lines (north/south, though the poles).
"Horizon dip angle"
We don't want to render the sky in a complete sphere around the camera, since at best, about 40% of it would never be seen, due to the ground beneath our feet. So, we define how far down the horizon goes, in degrees. This may vary from level to level. The trick is that we don't want the horizon too "high" - if the player can see into that region, he'll see whatever was rendered in the previous frame - making trippy ghost trails, etc. The dip angle is a latitude angle, and should be some value greater than 90.
"Pole color"
The overall color of the sky is specified by using five control points - different latitude angles. The "pole" is the color of the sky directly above, and is specified as a set 0-1 RGB values, where 0 is black, and 1 is white.
"45 degree color"
Color of sky at this latitude.
"70 degree color"
Color of sky at this latitude.
"Horizon color"
Color of sky at horizon (90 degree latitude).
"Horizon dip color"
Color of sky past 90 degrees.
"Glow color"
In addition to the overall sky color (which is symmetrical around the pole), the designer can specify a "glow" region in the sky. The color specified here is factored into the sky color based on the "method", as specified below.
"Glow latitude"
Latitude, where glow is centered.
"Glow longitude"
Longitude where glow is centered.
"Glow angle"
Total angular size, in degrees, of the glow.
"Glow taper"
The point at which the glow will begin to taper off. Can also be thought of as the "maximum" glow. Given that the glow is strongest in its center, and tapers of toward edges, this is a 0-1 value that represents the maximum glow strength. 0 would result in no glow. 1 would be "full" glow. Numbers in between would result in constant glow outward from its center point, until its computed strength is less than this value, then it would begin to taper off.
"Glow method"
This can be "Sum" or "Interpolate". If "Sum", then light from the glow is "added" into the sky color, so that a blue sky plus a red glow would make a purple sky. If "Interpolate", then a blue sky would be replaced by a red glow, as if it were an overlay.
NewSky:Stars
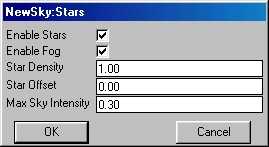
The new stars are real stars! I randomly chose midnight, at winter, at a latitude of 42 degrees. They are
affected by the intensity of the sky color at its position of the sky, so that if the sky is dark above, but
light at the horizon, the stars will become more dim toward the horizon.
"Enable Stars"
If the new sky is enabled, and this is enabled, new stars will be rendered.
"Enable Fog"
If enabled, stars will fog.
"Star Density"
A 0-1 value. If 1, you can expect around 800-900 stars in the sky. Lesser values weed out lower-intensity stars.
"Star Offset"
A value in feet, this says how much closer stars are to the camera than the sky. A value of 0 is just fine, but
larger values will place stars closer, and so will fog less than the sky.
NewSky:Celestial(1,2,3)
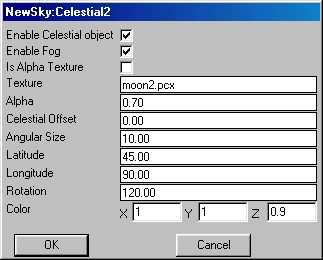
Currently, we support only three celestial objects, but we could add more if need be. A celestial object is expected to be something like a sun or a moon. 8-bit art is expected. Typically, a sun will be an alpha texture, and the moon will be a transparent one.
"Enable Celestial object"
When enabled, and the new sky is enabled, will render the celestial object.
"Enable Fog"
When enabled, will apply fog to the celestial object.
"Is Alpha Texture"
If specified, will treat the texture as a monochromatic alpha texture, where index 0 is transparent,
and index 15 is opaque.
"Texture"
Name of the texture that lives in fam\skyhw.
"Alpha"
Overall alpha level of the texture. If 1, will be opaque; 0 is invisible. Using a non-1 value may be
desired, for example, to make a daytime moon blend into the sky.
"Celestial Offset"
Like stars, this value, in feet, says how much closer the celestial object is to the camera than the sky is.
This will affect how the object gets fogged.
"Angular Size"
In degrees, how large the object is in the sky.
"Latitude"
Latitudinal angle of the object.
"Longitude"
Longitudinal angle of the object.
"Rotation"
Rotation angle of the object around its center so a designer can make a crescent moon face the way desired.
"Color"
0-1 RGB values applied to the object - to make the sun yellow, or moon a dark orange, or whatever.
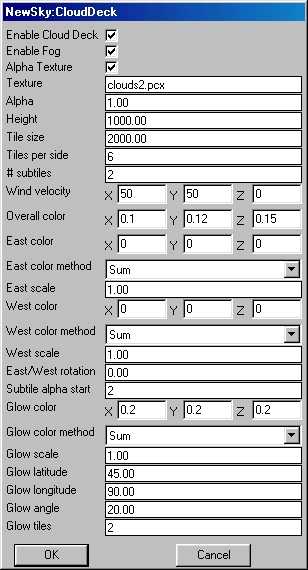
NewSky:Clouds
Go back to Official Guides & Tutorials